


Many small local businesses have a hard time optimizing their site for speed. Why is that? Well, site speed optimizations tend to require web development skills which most small business owners don’t have, and developers can be quite expensive.
What can you do if you don’t have the skills or budget, but still need to improve your site’s speed? In this article, I’ll explain how you can make improvements to your site speed even if you don’t have access to a developer.
Why improve site speed?
User experience and conversion rates can be negatively affected if your site is slow. It’s very common that your potential customers browse their phones for local services while they are watching TV or while they are running errands. So mobile speed is super important for local business websites.
Mobile searches surpassed desktop searches in 2016. According to one study, 56% of mobile searches done on the go have local intent. And I’m sure that today, that number is much higher.
Compared to desktop devices, mobile devices have a much slower download speed. Because of that, websites that are already slower will have an even harder time loading quickly on a mobile device.
How does this affect local businesses? The average bounce rate for pages loading within two seconds is 9%. As soon as the page load time hits four seconds, the bounce rate soars. The bounce rate at five seconds is 38%. In a nutshell, a page’s load time directly impacts bounce rate.
This will in turn have a negative effect on conversion rates.
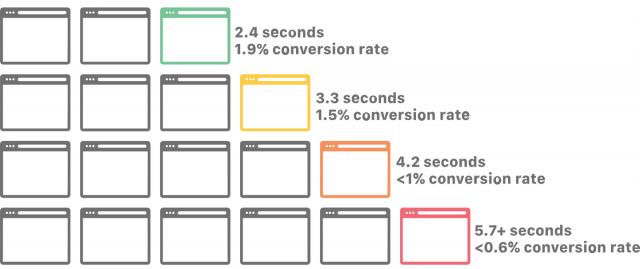
Source: Cloudflare
Want to see how your site stacks up? You can check out site speed benchmarks from Google here.
How to improve site speed
Do you want visitors to leave your site or do you want your visitors to convert? I’m betting it’s the latter. So you need to optimize for speed, after all… MO’ SPEEDS = MO’ LEADS!
For this tutorial, I’m going to show you how I used a couple of different paid plugins on a local optometrist’s website. The price to use both of them starts at about $60. This will make it much easier for you to speed up your site. Also, I hit a few snags during the site speed improvement process on this site so I’ll show you how to overcome real problems that may arise.
Before making any speed optimizations make sure you are using a quality web host. There have been many times that a client’s site speed improved a ton just by switching hosting companies. If you are spending $5/mo on hosting, you may want to consider an upgrade.
Additionally, I do not recommend making site speed improvements on a live site. I recommend using a staging site because some of the settings you are going to mess with can cause what users are seeing to “break”.
A staging site is a copy of your live site. This allows you to try out plugins and edit code without affecting the live site.
Baseline metrics
Before getting started we need to take some baseline measurements so that we can see if the site speed improved after the optimizations were made. I use a few free third-party tools for this:
Google Pagespeed Insights
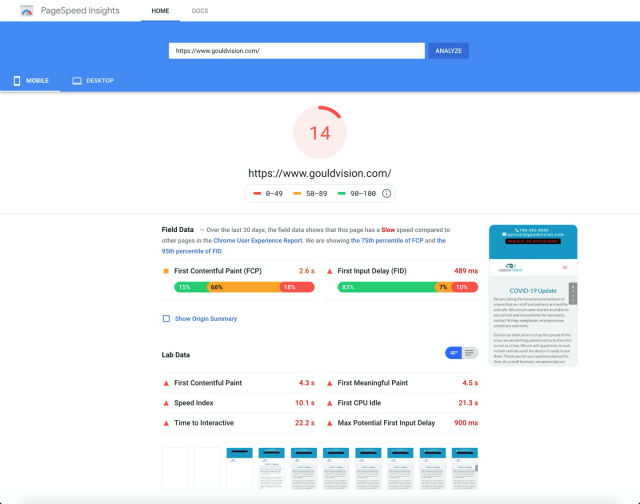
Google Pagespeed Insights gives you a speed score for mobile and lists specific site speed improvements you can make below the score.
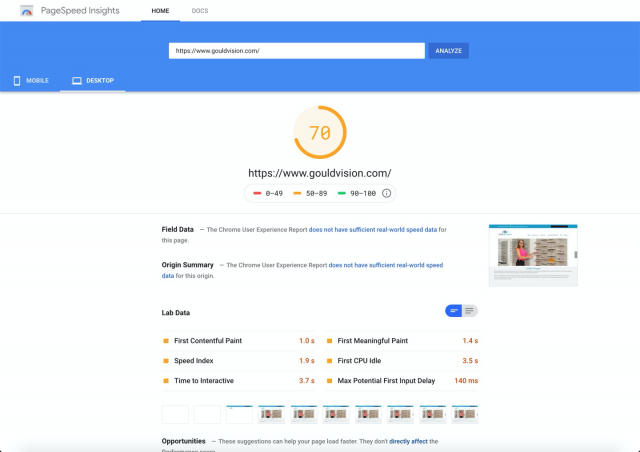
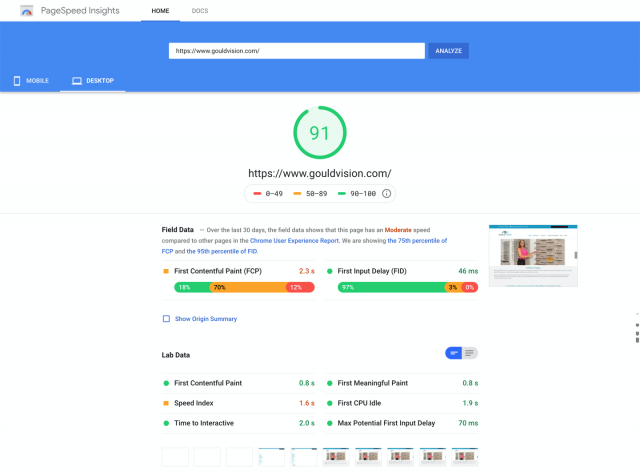
Google Pagespeed Insights also gives you a speed score for desktop and lists specific site speed improvements you can make below the score.
GTmetrix
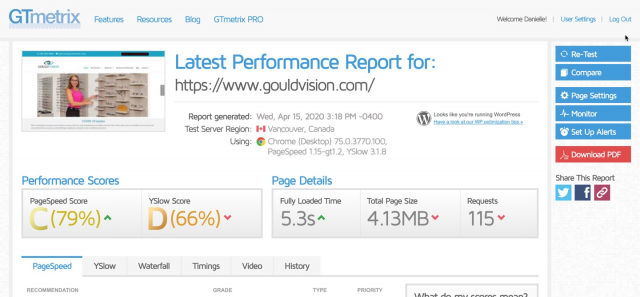
GTmetrix checks how fast your website loads.
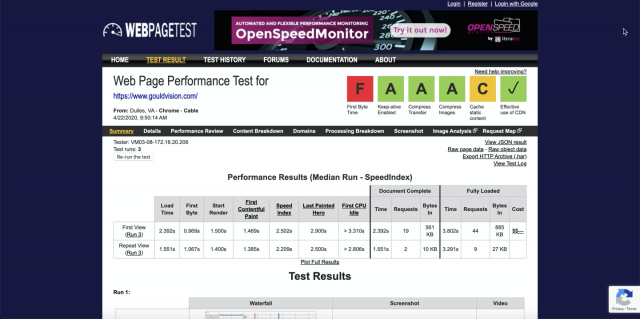
WebPageTest.org
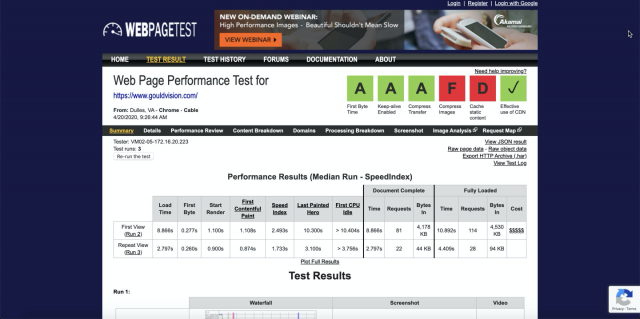
WebPageTest, as the name suggests, tests your website’s performance.
*Note: Only the first test showed a grade of A for “First Byte Time”. Each test afterward showed an ‘F’.
Content Breakdown by Domain (WebPageTest.org)
Site Speed Optimizations
Ok, so let’s get started! Let’s take a look at the site speed optimizations I performed.
WP Rocket
The first step I took was that I installed WP Rocket and disabled a plugin called SG Optimizer. SG Optimizer is a plugin from SiteGround but it conflicts with WP Rocket. So if you are not using SiteGround as your host, then you don’t have to worry about this.
In WP Rocket I turned on the following settings:
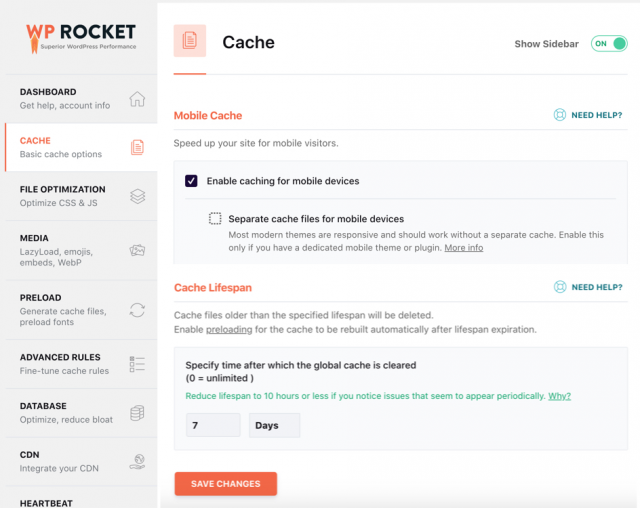
Cache
Mobile Cache: I checked this box to enable caching on mobile devices as well.
Cache Lifespan: I usually choose 7-10 days here for most small business sites. The cache lifespan determines how long you want cached files to be saved. The default limit is set to 10 hours.
But you can set it to a shorter timeframe if you are adding and updating content on the site multiple times a day. You can also set it to a longer timeframe if you don’t update your website frequently. If a site is posting once a week at most, you can set the cache lifespan to seven days.
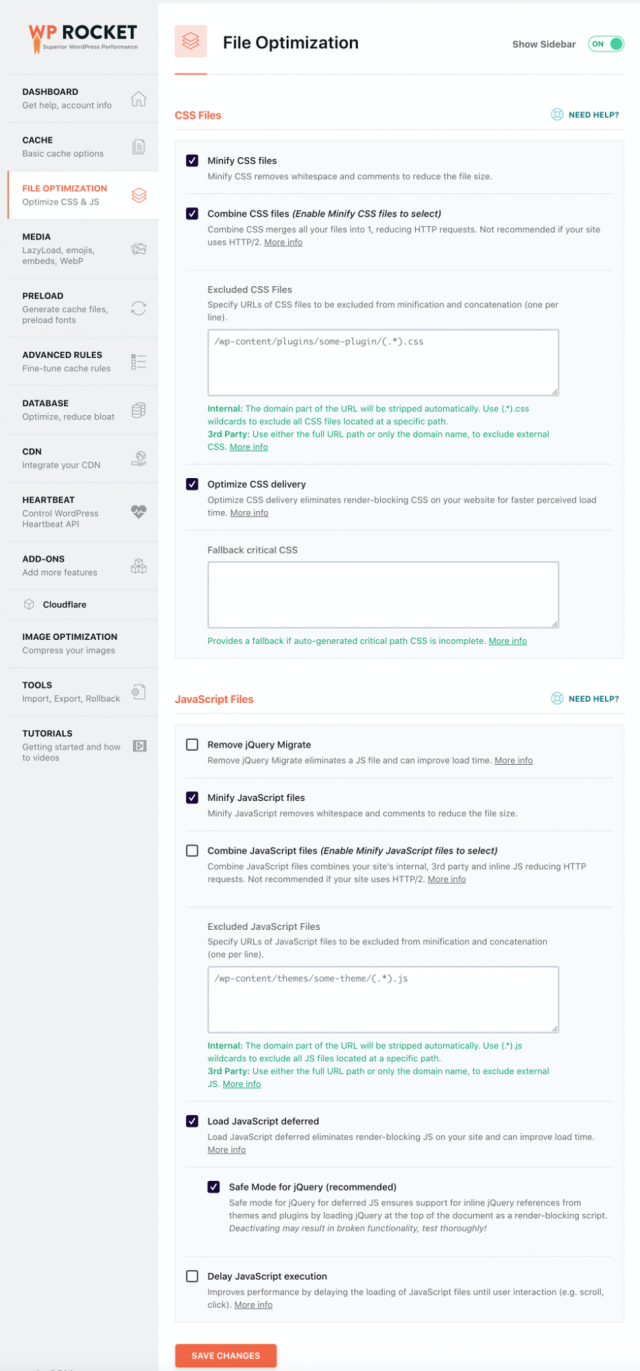
File Optimization
Once again I recommend making a staging copy of your site and testing it out on staging first, especially when using the “File Optimization” settings.
So what’s going on here is you are going to possibly make some files smaller and combine some files which can reduce page load times. In some cases, this may break things. A web developer could probably configure this section quickly but since you are doing it yourself, there will be some trial and error and testing required.
What I do is check one box at a time, clear the cache, and then view the page. If everything looks ok, then I go back and check another box and repeat this process.
At the very least, you should be able to check all of these boxes and not have any issues, but I can’t guarantee that.
CSS Files:
- Minify CSS files
- Optimize CSS delivery
JavaScript Files:
- Minify JavaScrip files
- Load JavaScript deferred
- Safe mode for jQuery
After you think you are done, you need to make sure to test any actions on the site as well to make sure they are still working. Examples include filling out forms to make sure they are submitting, clicking on toggles and tabs, etc. If an action has broken on the site it’s probably due to the JavaScript file settings you chose in the “File Optimization” settings. Try to undo them and test it again.
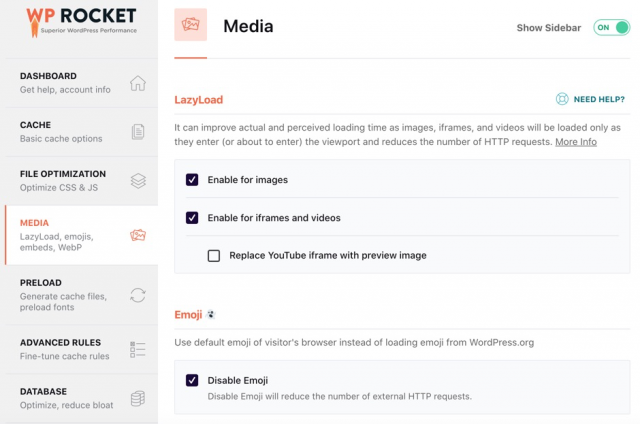
Media
LazyLoad: I enabled LazyLoad for images, and iframes, and videos. If you have YouTube videos on your site you can check the box to ‘Replace YouTube iframe with preview image’. However, I had issues with this once, so be sure to play the videos after checking this box to make sure they are working fine.
Emoji: I also checked the ‘Disable Emoji’ box in order to use emoji style from the user’s browser instead of loading an emoji file from WordPress.
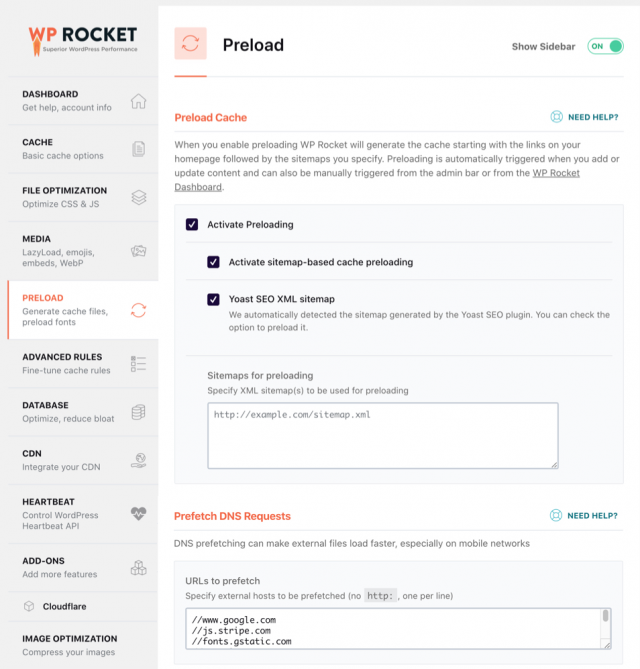
Preload
Preload Cache: This tells the browser to download and cache resources like CSS or JavaScript files as soon as possible. It’s used when those resources will be used on the current page you are loading.
I also checked the following boxes:
- Activate Preloading
- Activate Sitemap-Based Preloading
- Yoast SEO XML sitemap: Check this box if you are using the Yoast SEO plugin. If you are not using Yoast, do not check this box and paste your XML Sitemap URL into the “Sitemaps for Preloading” section below that.
Prefetch DNS requests: This tells the browser to download and cache resources like CSS or JavaScript files in the background.
Prefetch is given a lower priority so that it doesn’t interfere with the downloading of more important resources. It’s used when you know you’ll need that resource on another page that will be navigated to soon.
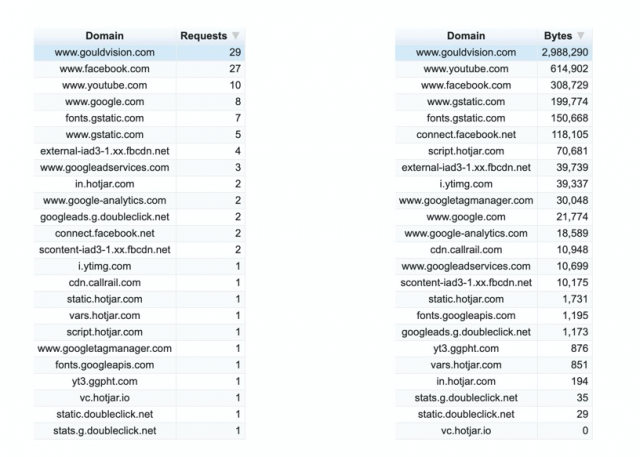
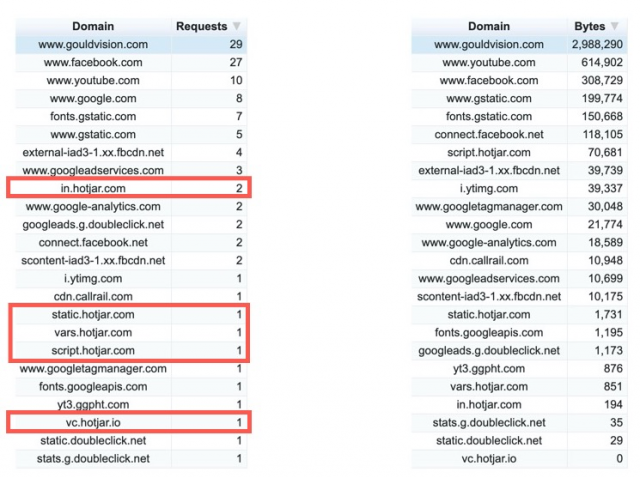
I used WebPageTest.org to see all the domains that have to be “looked up” when loading the site.
Content Breakdown by Domain (WebPageTest.org)
Then I copied all the external domains (and their subdomains) from the Content Breakdown by Domain report from webpagetest.org (pictured above.) Include “//” in front of each one like so:
//www.facebook.com
//www.youtube.com
//www.google.com
//fonts.gstatic.com
//www.gstatic.com
After you have your list, paste it into the Prefetch DNS requests section in WP Rocket.
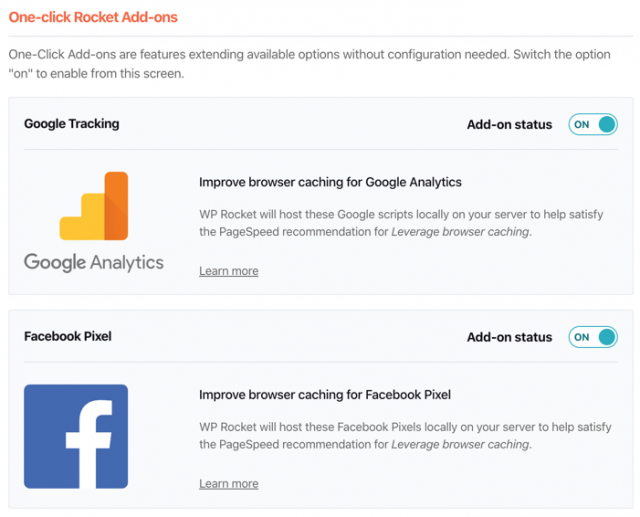
Add-ons
I turned on the following ‘Add-ons’:
Google Tracking: WP Rocket will host Google Analytics scripts locally. If you are not using Google Analytics, then you don’t need to turn this on. But you should be using Google Analytics!
Facebook Pixel: WP Rocket will host Facebook Pixels locally. If you are not using a Facebook Pixel, then you don’t need to turn this on.
Cloudflare: This site happens to use Cloudflare so this integration was set up. If you don’t use Cloudflare, then don’t worry about this one.
ShortPixel
ShortPixel makes optimizing all images on your site a breeze. It compresses all images and thumbnails for you. After compressing all the images, it automatically replaces all the original images on the site.
I installed ShortPixel and used the following settings:
General Tab
Compression Type: I chose ‘Lossy’ for this site. If you don’t want images on your site to have a visible loss in quality, you may want to choose Glossy or Lossless. If you are not sure which one to use, read this guide from ShortPixel.
Include Thumbnails: Turn this on so that thumbnails (not only large images) are compressed.
Image Backup: Turn this on. It will allow you to restore images to their original state or to convert them from Lossy to Lossless and back again.
Advanced Tab
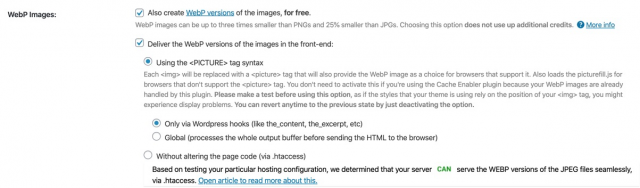
WebP Images: Choosing this option allows WebP versions of your images to be served if a user’s browser supports it.
According to Google, “WebP is a modern image format that provides superior lossless and lossy compression for images on the web. Using WebP, webmasters, and web developers can create smaller, richer images that make the web faster.
WebP lossless images are 26% smaller in size compared to PNGs. WebP lossy images are 25-34% smaller than comparable JPEG images at equivalent SSIM quality index.”
Cloudflare API Tab
This site happens to use Cloudflare so this integration was set up. If you don’t use Cloudflare, then you don’t have to worry about this setting.
Processing Images
After you have chosen all your settings, click on ‘Save and Go to Bulk Process’. This will start the compression process and will take a while.
After bulk compressing the images, you can see how much disk space and bandwidth you saved.
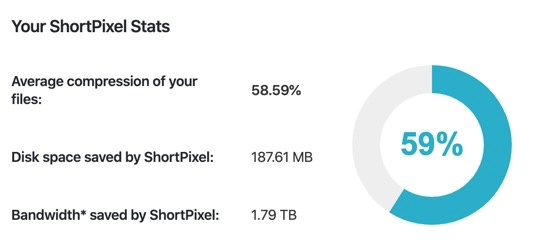
Saved bandwidth is calculated at 10,000 impressions/image.
One Last Tweak
The home page had a slider that contained four large slides/images. The client was fine with replacing this with just one static image. Doing this shaved off even more loading time.
In cases like this, I highly recommend that you use one static image with a CTA on top of it on the home page, instead of using a slider.
Removing Unnecessary Codes
After installing and configuring WP Rocket and ShortPixel there were still many other site optimizations that could still be made. I’m going to show you how to do some of the easier ones that don’t require a developer.
‘Reduce DNS lookups’ was one of the leftover site speed suggestions. There are some things you can do but they are a little complicated and require technical skills. But what you can do to improve this is simply remove unnecessary third-party code from your site.
Once again, I used WebPageTest.org to see all the domains that have to be “looked up” when loading the site. This can show you what scripts are on the site and then you can decide if any can be removed.
Removed Unused Scripts
I could see in this list that the site had Hotjar installed on it. I asked the client if they were still using Hotjar and they said “no”. So I simply removed this script. That instantly removed six requests from the list.
Content Breakdown by Domain (webpagetest.org)
Redundant Facebook and Google Maps Embeds
This site had Facebook and Google embeds in the sidebar more than once. So I removed the duplicate embeds and cleaned up the sidebar.

Store Files Locally
You will notice in the screenshot above there were quite a few domains from Google and Facebook. In WP Rocket, I used the Google Tracking and Facebook Pixel add-ons. Now these files will be stored locally instead. When you host these files locally, all the requests for them are from the same domain.
After taking these steps the number of requests for this site went from 115 to 44!

Results
Google Pagespeed Insights
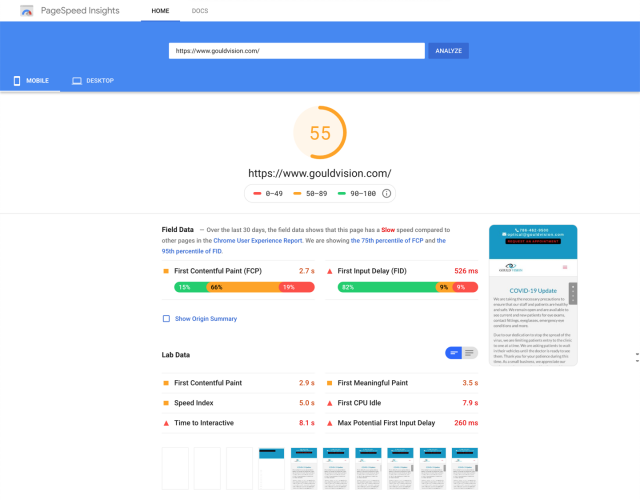
You can see that the mobile score from Google can still be improved. I’m actually glad this happened with this project because it shows realistically what challenges you may face when optimizing a site for speed.
GTmetrix

WebPageTest.org
Content Breakdown by Domain (webpagetest.org)
Before and After Chart
| Tool | Before | After |
|---|---|---|
| Google Pagespeed Insights: Desktop Score | 70 | 91 |
| Google Pagespeed Insights: Mobile Score | 14 | 55 |
| GTmetrix: Pagespeed Score | C | A |
| GTmetrix: YSlow Score | D | A |
| GTmetrix: Loaded Time | 5.3s | 4.2s |
| GTmetrix: Page Size | 4.13 MB | 888 KB |
| GTmetrix: Requests | 115 | 44 |
| WebPageTest: First View Load Time | 8.866s | 2.392s |
Remaining Issues
‘TTFB’ stands for ‘time to the first byte’. This is how long it takes for the first byte to be received by the browser after an HTTP request has been made.
TTFB was not great on any of the site speed tests except for the first one on webpagetest.org which must have been a fluke. A high TTFB can be due to poor hosting or could be from routing through Cloudflare. This site seems to have decent hosting so most likely it could be Cloudflare.
Conclusion
So there you have it! You can speed up your local business website with just a couple of paid plugins. Of course, you can’t fix everything but you can knock out quite a few quick wins on your own.
Although site speed is just one small piece of the local SEO puzzle (among the likes of Google Business Profile optimization, reviews, and link building), it can have a considerable affect on bounce rates, conversion rates, and user satisfaction.